01594 841 014
(Mon-Fri 9.30am-4.30pm)
A simple written guide on how to install a drip irrigation system in your garden at home. We have also added videos into the guide to show you how the different irrigation components fit together.

The start of your drip Irrigation system will need to be the water source, usually from an outside tap. There are other methods which we will go through further down the page.
So whether the drip system is for flowers, vegetables, pots ,hedges or raised beds they all start the same. You will need a length of hose that takes the water to the area you want to start your drip irrigation. To make up this connection hose you will need a tap connector on your tap which allows a 13mm hose connector and a length of standard 13mm garden hose.
This hose will plug into the start of your drip irrigation system. This component is called the master unit and it reduces the water pressure down so its suitable for the drip system. If your tap happens to be next to the area you need the drip irrigation you can screw the master unit onto the tap.
From the master unit you can attached the 13mm connecting pipe or you can in some circumstances you might go directly into the more flexible 4.6mm supply pipe.
The 13mm connecting pipe is the main pipe which you need to run around the area that you need to be watered. To navigate the pipe around you can use L and T joints for corners and junctions and you secure the pipe in place with pegs.
As the 13mm pipe is fairly rigid you will have situations where you need to add a reducing T-Joint which allows you to have the smaller 4.6mm supply pipe. This smaller more flexible pipe is great when your adding drip heads into potted plants. To fit a joint connector you will need to cut the pipe with secateurs or a pipe cutter and then the connectors simply push onto the hose and are twisted to secure the fitting.
Using this combination of pipes you can locate the drip heads and sprinklers exactly where you need them. There are a few different drip heads available which release the water at different rates some are adjustable so you can easily change the rate depending on the the plants needs. If you have situations where the drip heads are at a different height then you can use pressure compensating heads to make sure they are still releasing water at the correct rate.
Drip heads can be fitted directly into the 13mm connecting pipe, T-Joints and at the end of the supply pipe quickly and easily with the assembly tool.
At the end of the pipes where you don't have a drip head or sprinkler you'll need to cap off the system with a plug.
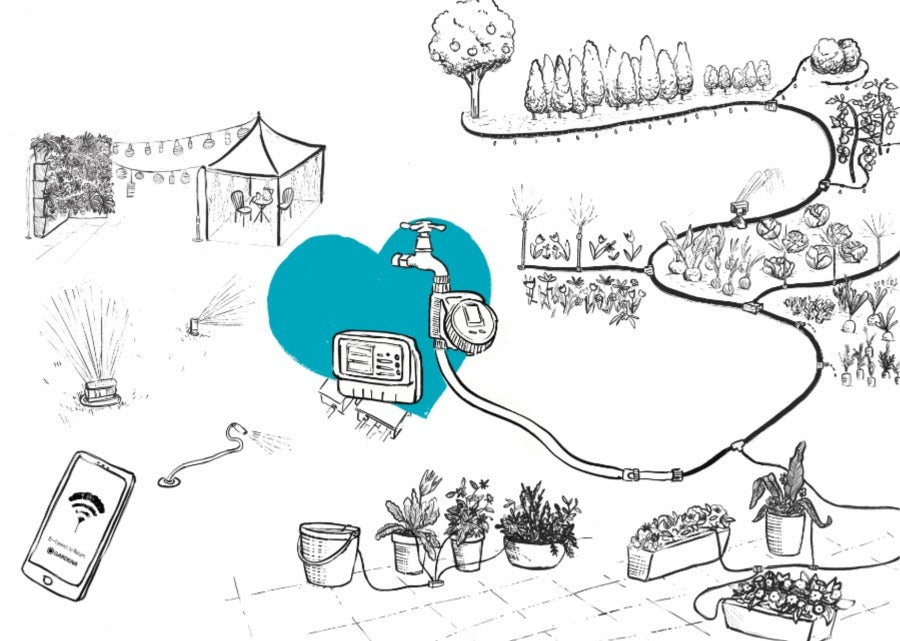
Below is a diagram of a installed drip irrigation system so you can see what's possible.

You may notice in the diagram at the tap there is a water timer. This would be the next step if you wanted to automate your watering system, especially useful while your away. Another way to schedule your watering is to add a smart system water controller to the set up. This enables all types of scheduling as well as remote monitoring and control of the system. If you wanted to increase your watering efficiency even further then you can also go as far as adding moisture sensors which you place in the ground to maintain a particular moisture level in the soil.
MINCOST TOP TIP!
One final tip that really helps when installing a drip irrigation system is to lay out all the components in the position they are required before cutting the pipes. It helps you picture how the system will fit together and makes sure you have each drip head/spray nozzle in exactly the right position. It also reduces the chance of you cutting the pipe to short or to long etc. The video below shows you this process.